Blog Post
Web Analytics

Nadine
Wolff
published on:
16.02.2017
Using Headlines and Page Titles in Google Tag Manager
Table of Contents
The Google Tag Manager is a widely used tool for managing tags. In this context, a tag is an element or an action that should be investigated/tracked on the page. By defining trigger rules, you can set when certain events, such as a click on a button, the submission of a contact form, or the visit of a specific page should occur.
Variables allow you to extract specific information from the page. This includes page titles and text headings. These help make the event tracking reports clearer. We will show you how it's done.
Getting Started with Google Tag Manager
The Google Tag Manager is purely a management tool and allows users who have no special theoretical knowledge to implement comprehensive tracking. Via the UA number of the Google Analytics property, which is unique for each created property, the captured data and values can be directly transmitted to the reports.
There are already templates available in Google Tag Manager for many tag types that can be utilized.
These include, for example:
Universal Analytics
AdWords Conversion Tracking
DoubleClick Floodlight Counter, or also
Ve Interactive Pixel
Custom HTML tags or custom image tags can also be used for tracking or investigating a particular element.
An important function lies with the variables in Google Tag Manager. By defining variables, you can transfer specific information from the page into the Google Analytics report or use it as a trigger condition.
Why Query Page Titles and Headings?
A typical event tracking is the click on a button. Especially if the buttons are on a site-wide element, like the footer or the header, it can define on which page the user performs the interaction. Surely the predefined variable {pagepath} or {pageurl} can be used for this. But is this representation in the Google Analytics report actually user-friendly? It's much clearer if instead of the URL path, you use the page title or a heading such as
<h1>,</h1>
<h2>,... to display. We'll show you how this works in the next section.
Creating Variables with JavaScript
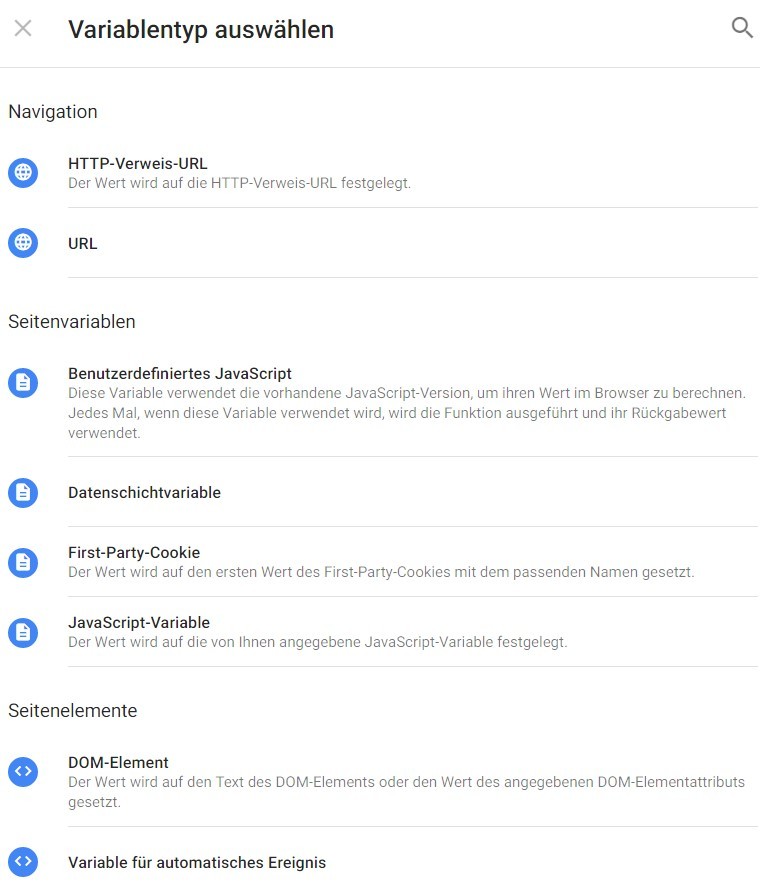
Creating variables is similar to setting up tags. If you want to create a new variable, you immediately get several selection options.

Fig. 1: Selection options when creating a variable
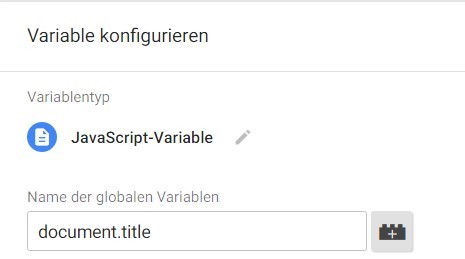
To capture the page title, you can use the JavaScript variable, as it can always be retrieved the same way.
The name of the variable is document.title and must be entered in the field: "Name of the global variable." The created variable looks like this:

Fig. 2: JavaScript variable for the page title
So, it's not rocket science to capture the page title from a page.
It is also possible to extract the contents of individual elements from the document and use the information either as a trigger condition or for a user-friendly report.
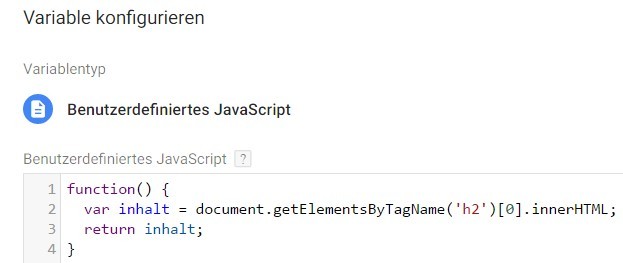
To enable this, the getElementsByTagName() method is used. Create a new variable and choose the variable type Custom JavaScript. Create the variable using the following example to retrieve the first H2 heading on the page.

Fig. 3: Custom JavaScript to read out an H2 heading
Through this function, you can, of course, read all other headings or HTML elements as well. Replace the value in the round brackets, including quotes (highlighted in red in the screenshot) with e.g., “img” for images. In the following square brackets, elements are numbered. It starts with zero. This means if a zero is in the square brackets, the first H2 heading is retrieved; with a one, the second H2 heading, and so on.
The command .innerHTML indicates that the entire string between the angle brackets is output. This addition can also be omitted, thereby passing the entire string.
Excursion: How to Test the Commands
We often feel a sense of security when certain commands, or in this case methods, can be tested in advance. For this, you need to open your browser's developer console. Click either F12 or use a right-click on the page and select "Inspect Element" in Firefox or "Inspect" in Chrome. A field with all information about the page opens at the bottom of the screen:

Fig. 4: Developer Tools Console in Chrome
Now navigate to the second tab "Console." Here you can check what response you get when running the scripts.
The following screenshot shows the test for the transfer of the page title and the query of the first H2 heading on the page. Confirm the input with Enter to see the result being displayed.

Fig. 5: Query of the page title and the first H2 heading in the console
Applications of the New JavaScript Variables
Once you have implemented the new variables in the Google Tag Manager, you can use them directly in the tags. As mentioned at the beginning of the article, the biggest advantage is the simple and clear report display in Analytics.
A typical use of the variables is the success measurement of blog posts. It should be examined how often the article has been shared. With this click tracking (click on the share button), it can be captured over which social channel (e.g., Facebook, Twitter, or Google +) the post was shared. Due to the clear display in the event report, in our blog the H1 heading is best suited for this, as the following screenshot shows:

Fig. 6: Verifying the H1 heading in the blog
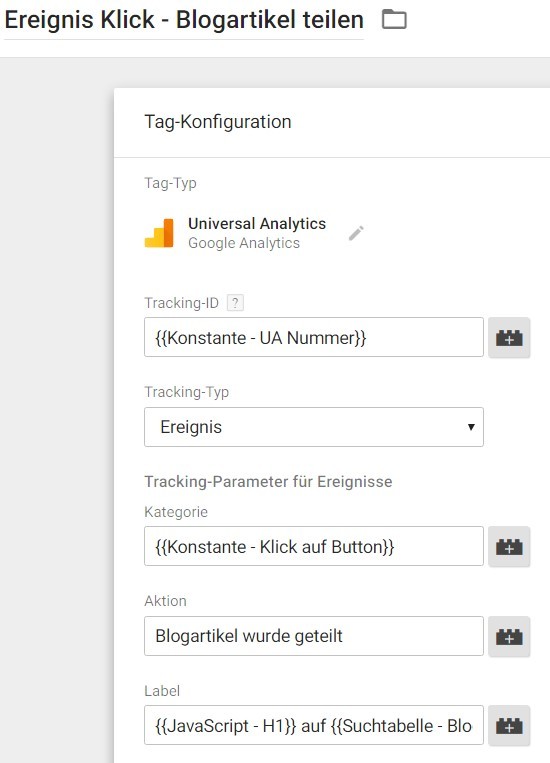
In our example, this information would be suitable as an event label. In the tag settings, you can now select the previously created variable over the "PLUS" sign.

Fig. 7: Tag settings to capture which article was shared
We additionally capture the channel (Facebook, Twitter, Google +) through which the article was shared using lookup tables in the event label.
To see the collected values and data, switch to the Google Analytics reports. The numbers from the event tracking can be found under
Behavior Events Top Events
What Can We Do for You?
Do you still have questions or need more information on the proper use of web analytics and evaluation with Google Analytics? We would be delighted if you contact us. We're happy to assist you.

Nadine
Wolff
As a long-time expert in SEO (and web analytics), Nadine Wolff has been working with internetwarriors since 2015. She leads the SEO & Web Analytics team and is passionate about all the (sometimes quirky) innovations from Google and the other major search engines. In the SEO field, Nadine has published articles in Website Boosting and looks forward to professional workshops and sustainable organic exchanges.


