
Blog Post
Web Analytics

Thorsten
Abrahamczik
published on:
11.05.2017
A/B Testing with Google Optimize
Table of Contents
With Google Optimize, the search engine provider has introduced a new tool for conducting experiments on websites. Originally introduced as part of the Google 360 Degree Suite, Google now offers the program, with few restrictions, also in a free version. This makes it easy for all marketers to use the tool for their own experiments.
Fig. 1: The homepage of Google Optimize
In addition to A/B tests, the program also supports multivariate and redirect tests. The following will distinguish between the different types of tests:
A/B Testing: In this case, individual variants of the same webpage are tested. The variants usually differ only in small parts, such as a different button color or a new call to action.
Multivariate Tests: These tests work similarly to A/B tests, but in this case, multiple elements of a page are tested to find the best possible combination of elements. At the same time, user interaction between the individual variants can be better examined to conduct a conversion optimization. This quickly results in a significantly larger number of variants.
Redirect Tests: In these tests, separate pages with their own URLs are tested against each other. This way, different variants of complete pages can be well tested.
Creating an Account and a Container in Google Optimize
To get started, users must open the homepage URL of Google Optimize. When opening for the first time, email subscriptions for (tips & recommendations, product announcements, and market research) are suggested, but can also be declined. In the next step, the user must configure their account settings once.
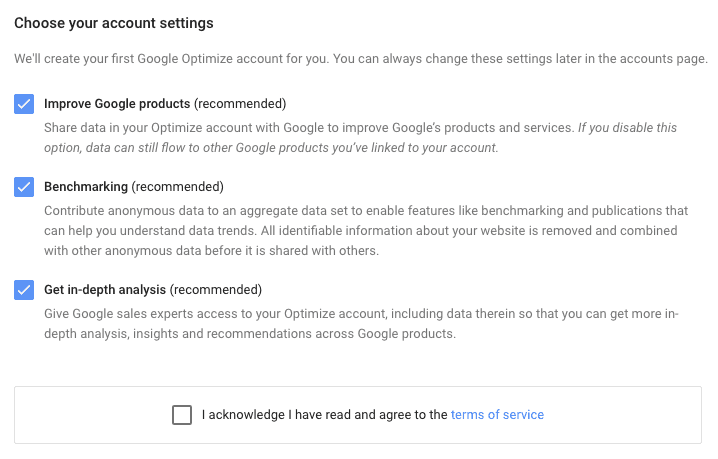
Fig. 2: One-time configuration of the Google Optimize account
After making the changes as shown in Figure 2, you can immediately start creating a website test. A user account and a container are immediately created in the next step for the user, where the tests can be managed and configured. The setup is identical to that of Google Tag Manager, which also relies on an account with individual containers. This makes operation noticeably easier.
Start with Your First Test
Before marketers start creating a test, they must ensure that the website to be tested has a lot of traffic. Only then can valid data be collected. If a website only has a few visits per month, analyzing a test takes significantly longer to obtain statistically valid tests. In this case, only a few variants should be tested.
Moreover, marketers should initially conduct only small tests, such as changing a button color or replacing a text. This allows them to learn how to use the tool and find out more precisely how to create meaningful and good tests. More complex tests can be created at a later date.
To start a test, the user must create a new experiment. Google offers templates for this, into which the user must enter a name for the experiment, a URL for the page to be examined, and the type of test. Figure 3 shows the corresponding Google Optimize screen.
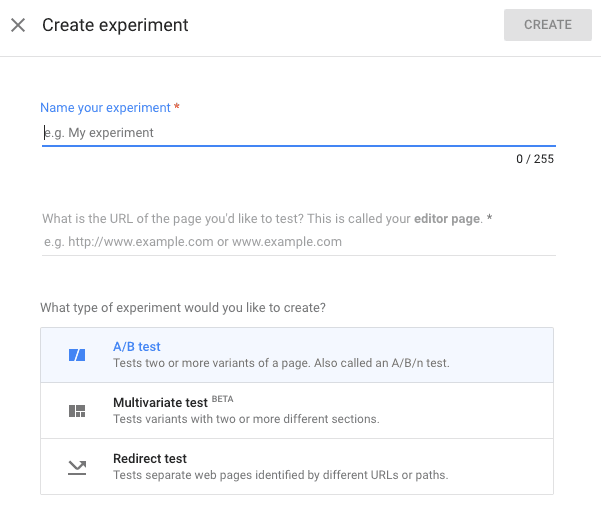
Fig. 3: With this information, an experiment can be created in Google Optimize.
Work with Variants
Once an experiment is created, the user can create so-called variants. These are slight variations within the webpage. Regardless of the number of variants, each variant is always tested against the original version of the website. The marketer can also determine at this point how many percent of the traffic should participate in the test and how much traffic each variant should receive. By default, 100% of the traffic participates in an A/B test, and this traffic is evenly distributed across all variants. So if there is the original version of the website and a variant version, both variants receive 50% of the traffic.
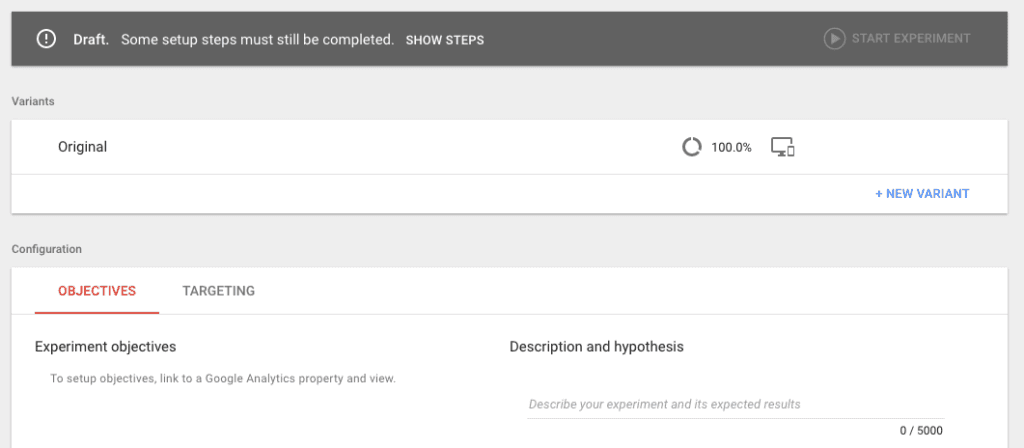
Fig. 4: For each test, a goal and a hypothesis must be set.
After the variant has been created, goals and descriptions must be stored for the test. Examples of test goals include:
Reducing bounce rate
Increasing page views
Increasing transaction counts
Subsequently, the individual variants must be configured. A visual editor is used for this, allowing the marketer to make directly visible changes to the webpage. For small changes, no knowledge of HTML, CSS, or JavaScript is needed. Complex changes using HTML, CSS, or JavaScript require a general technical understanding of HTML and CSS. Programmers should be involved for changes in JavaScript.
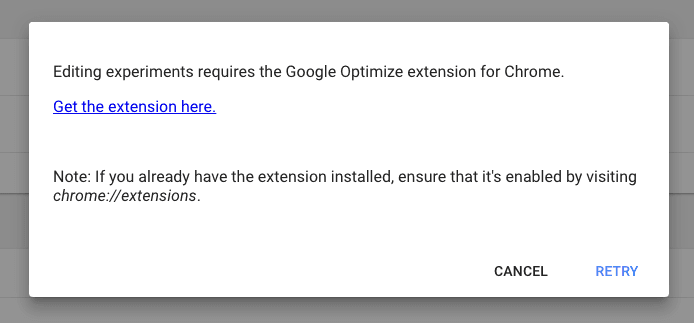
Fig. 5: Google recommends installing the Google Chrome browser plugin to operate the visual editor of Google Optimize.
To work with the visual editor, a browser plugin must first be installed. Google Chrome checks for the presence of the plugin and, if not present, suggests installation, as shown in Figure 5.
Once the plugin is installed, the user can open the webpage and make adjustments. Figures 6 - 10 show how users can make adjustments:

Fig. 6: By mouse-hovering, the user selects a webpage element. The individual elements are directly marked and highlighted by Google Optimize.
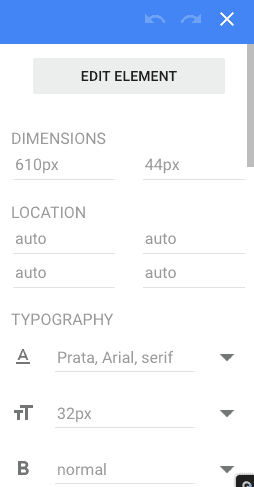
Fig. 7: Changes to the selected element can then be made via the visual editor at the bottom right of the screen.
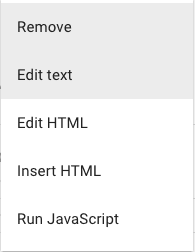
Fig. 8: By clicking "Edit Element" in the visual editor, further options can be selected, in this case, "Edit text".

Fig. 9: The text of the H1 heading can then be slightly modified.

Fig. 10: The bar at the top of the screen shows, among other things, which element the user is in (H1), how many changes have been made, and how the respective change looks on different devices such as desktop, tablet, and smartphone.
Once the desired changes are made and saved, the appearance and behavior of the changes must be checked on every device. Errors quickly occur due to individual programming, which can be avoided by extended checks.
Link Google Optimize with Google Analytics
In the next step, Google Optimize must be linked to Google Analytics. For this, the user chooses a data view within the desired Google Analytics property. The user behavior data of this data view is then used to evaluate the test. This way, the change in bounce rate, the number of transactions, etc., can be considered in the experiment.
Integrating Google Optimize via Google Tag Manager
In its developer area for Google Optimize, Google recommends using a customized Google Analytics code. This loads faster and prevents screen flickering due to dynamically made adjustments to the website. This means the user does not see when a different variant is displayed on page load.
Of course, Google Optimize can also be integrated via Google Tag Manager. In this case, the Google Tag Manager code should be as high up in the source code as possible. This is necessary to avoid possible screen flickering. The sequence of execution of the various codes when a page is called is as follows:
User calls the page
Google Tag Manager code is executed
Google Optimize code is executed
Google Analytics code is executed
Therefore, using the Google Tag Manager results in a delay in execution because Optimize can only be executed once the Tag Manager has been loaded and executed. This is not the case when using a customized Google Analytics code, allowing the Google Optimize code to run immediately. This can reduce or completely avoid the mentioned screen flickering on pages with many images or resources to load.
Google Analytics should, in any case, regardless of the use of Google Tag Manager, only be executed once the Google Optimize code has been executed. A corresponding configuration must be made in the advanced settings of all Google Analytics tags on the webpage.
Figure 11 shows the configuration of a Google Optimize tag in Google Tag Manager. In this tag, essentially only the property ID of Google Analytics (also known as the UA number) and the container ID of the Google Optimize experiment need to be entered. To comply with data protection, the IP address should also be anonymized. The trigger should be configured as precisely as possible to trigger the tag only when the corresponding page is called or the corresponding event is triggered.
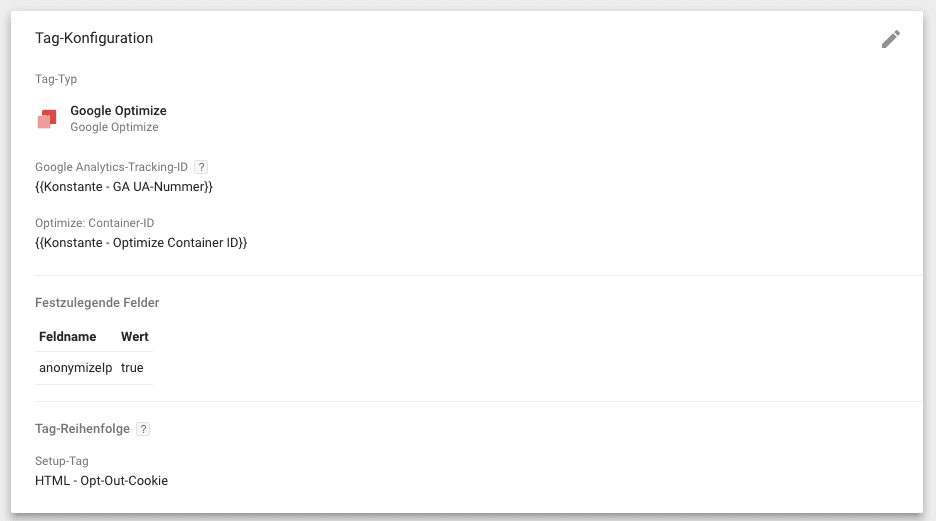
Fig. 11: Configuration of a Google Optimize tag in Google Tag Manager.
Defining the Target Audience and the Time Frame
Once the Google Optimize tag has been published in the Google Tag Manager or the Google Optimize snippet has been embedded in the page's source code, further configuration of the experiment can be made. For this purpose, the target audience and the time frame of the test must be defined.
In the free version, it is only possible to select for the target audience how many users should participate in the test. Granular settings regarding the target audience, such as age, gender, or access source, are currently not possible.
The time frame can be set individually. Alternatively, the test can also be started and stopped immediately if desired. Figure 12 shows the currently possible settings.

Fig. 12: Setting the target audience in Google Optimize.
After an experiment, marketers can evaluate the results in the reporting area. Here, both the overall data and the data of the individual variants are displayed separately. In addition to standard data such as page views, the winner of the test is also shown, including improvements compared to the baseline.
Furthermore, the individual variants are checked against the set goals. This makes it easy to see, in conjunction with other Google Analytics data, at what time of day and at what hour the variants each improved.
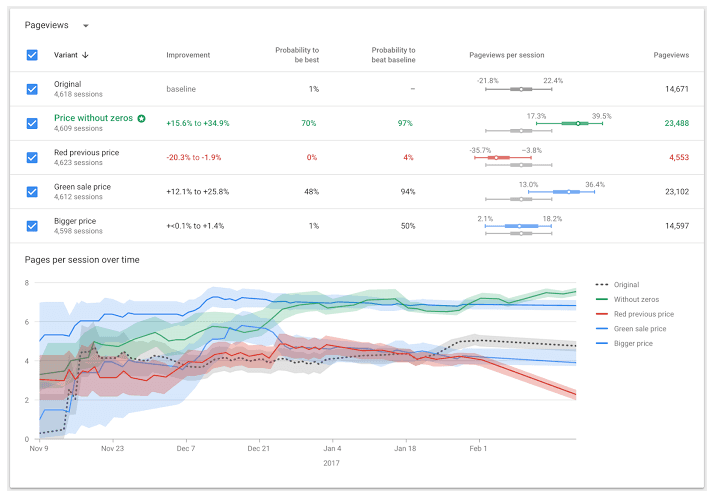
Fig. 13: Evaluation of the results of an experiment. Source: https://support.google.com/360suite/optimize/answer/6218117?hl=en.
What We Can Do for You
Do you want to test individual elements of your website to increase conversions, leads, or transactions? Get started with the free version of Google Optimize to quickly and easily conduct individual experiments. We are happy to advise you on the implementation and evaluation of appropriate tests for conversion optimization, in connection with the website goals you have set. Contact us.

no comments yet


