Blog Post
Web Analytics

Thorsten
Abrahamczik
published on:
31.08.2017
Early configuration of Google Tag Manager with the Tag Manager Injector
Table of Contents
The Tag Manager Injector, as a Chrome browser plugin, enables easy setup of the Google Tag Manager within Google Chrome. Without long waiting times, we can start assisting our clients promptly, without being forced to wait. In the meantime, the client's IT department can take their time with implementing the Tag Manager code into the website's source code.
At the beginning of our collaboration, we closely coordinate with our clients to create tailored tracking concepts. At this stage, it is often not yet clear what exactly should be tracked and which metrics will provide value for the client.
Once the tracking concept is finalized and approved by the client, we begin implementing it. For this, the Google Tag Manager code must first be incorporated into the page's source code. However, this process can typically take several days, as the client's IT department may not be able to implement it right away. To still start the configuration during this time, we use the Chrome browser plugin Tag Manager Injector. This makes you much less dependent on the client's IT and allows for faster work.
Requirements for Using the Tag Manager Injector
To use the Tag Manager Injector, a Google Tag Manager account must first be created. Within this account, a container must then be created. Subsequently, the Google Tag Manager will release the code to be integrated for the container, which the IT department will need to embed. At this point, we can already begin using the Tag Manager Injector to configure the newly created container. An important aspect in this context is the unique container ID, which identifies this specific container.

Fig. 1: The container created in Google Tag Manager with its container ID
Using the Tag Manager Injector
Once this process is complete, you go into the newly created container and set up the first tags, triggers, and variables. At this stage, the container can already be configured to how it will later be used. There are no restrictions here, as third-party tags can be used just like scripts.
After setting up the first tags, the preview mode of the Google Tag Manager should be activated. This way, you can check whether the tags have been configured correctly.
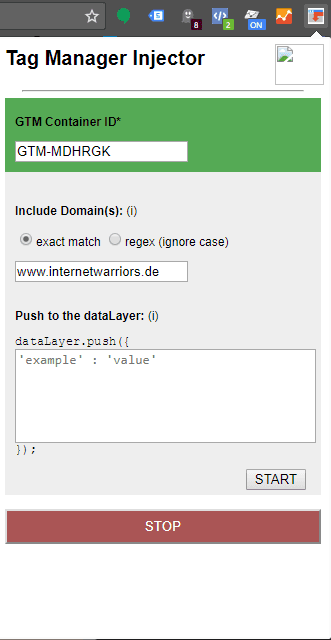
The next step is to install the plugin. Once the plugin is active, it can be used. For this, click on the plugin itself and you will get a simple input mask where you enter the container ID of the previously created container. Next, under "Include Domain(s)," enter the domain where the Google Tag Manager container should be used. Afterwards, simply click the "Start" button. Once the Tag Manager Injector is active, the top area near the GTM container ID will turn green.

Fig. 2: The configured and usable Tag Manager Injector
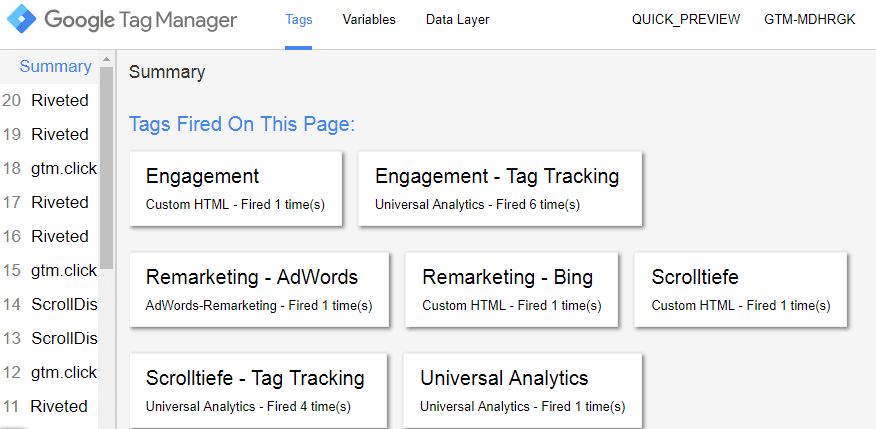
By activating the preview mode in the container, the normal preview window of the Google Tag Manager now opens on the website in the browser. It is now easy to see which tags are triggered, what variable values are output, and what the data layer looks like. If you want to push specific values to the data layer, the Tag Manager Injector offers the clearly visible "Push to the data Layer" input field for this purpose. Simply enter the relevant details, and the data is transmitted.

Fig. 3: The Google Tag Manager preview window in the browser
The real-time report in Google Analytics now shows initial access, indicating that the Google Analytics tracking is functioning.
How Can We Help You?
Do you want to implement web analytics on your site, following a defined tracking concept but are unsure how to execute it? Do you want to measure and increase conversions more effectively, but encounter problems with implementing additional tracking? Contact us and we will gladly assist you in improving your web analytics.

no comments yet


