Blog Post
Web Analytics

Thorsten
Abrahamczik
published on:
18.11.2015
Google Analytics Basic Configuration – What You Should Know
Table of Contents
In our last article on web analysis "The Best Tools for a Successful Start in Web Analysis", we have already discussed tools that assist with setting up Google Analytics. In the next step, we want to explain how the basic configuration of a modern Google Analytics implementation should look.
In our daily business, we repeatedly see that Google Analytics is either incomplete or incorrectly implemented. And in cases where it is properly implemented, it is used little or not at all. This often has two reasons:
The online marketing manager is unsure whether the tracking is correctly embedded and whether they can trust the numbers.
The online marketing manager has no time for analysis or finds the tool too complex.
With this article, we aim to address the first possible reason. Through a brief guide, we want to explain how you can flawlessly incorporate and use Google Analytics on your website. In addition, we will give you a tip on how you can largely ensure the quality of your data by using a spam filter. Eoghan Henn has written an article on this topic. The prerequisite for implementation is using a Google Tag Manager account and one-time access to your page's source code. We have already described what exactly the Tag Manager is in the article "Manage Your Online Marketing Tags Centrally with Google Tag Manager".
Create Account, Property, and View in Google Analytics
Check if an account already exists in Google Analytics for your company. If not, please set up an account and a property in Google Analytics. For the new setup in Google Tag Manager, a Google Analytics UA number is necessary. Therefore, this step must be executed first.
Each property should receive the following three data views:
Live environment,
Test environment, and
Raw data.
In this case, you must go to your "Standard" data view and click the "Manage" button at the top there. You can then click the drop-down menu on the right and select the "Add Data View" submenu. In the raw data view, there must be no filters that change or exclude certain data. Please do not forget that the internal search can also be included in the raw data view (if it is available on the site). The data views "Live environment" and "Test environment" must always be set up the same. The test environment will later be used to test new elements, like filters or such, in advance. This way, you can check in the test environment before transferring them to the live environment. This ensures that the data in the Google Analytics live environment is always correct.
A "custom dimension" must now be set up at the property level under "Manage" -> "Custom Definitions". This will later be used to prevent spam that comes through the so-called Measurement Protocol in Google Analytics. Please remember the associated index number. It is important that the status of the new dimension is "Active" at the end. The following entries need to be made there:
Name: Exclude Ghost Referral Traffic
Scope: Hit
Active: Checkbox is checked
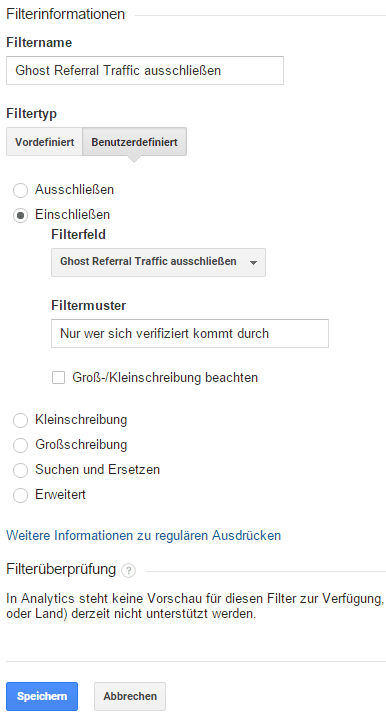
A filter must now be created in each data view. This will later only allow metrics with a "password protection" in Google Analytics. This way, the metrics in Google Analytics can be kept mostly spam-free. Once the filter is created, you can easily copy it into other data views using "Apply Existing Filter". Go to "Manage" -> "Filter". The filter has the following conditions:
Filter name: Exclude Ghost Referral Traffic
Filter type: "Custom" -> "Include" -> "Exclude Ghost Referral Traffic"
Filter pattern: "Exclude Ghost Referral Traffic"

Finally, a second filter should be created in each data view, which standardizes the URLs. This will possibly reduce the number of URLs in Google Analytics but improve the quality of the metrics. Imagine you have two identical URLs, one of which contains uppercase characters. This filter ensures that all URLs in Google Analytics are always written in lowercase. This way, you will only have one URL in Google Analytics in the future, aggregating the metrics from two pages. This greatly facilitates the analysis. The following conditions are to be set for this filter:
Filter name: Standardize URLs
Filter type: "Custom" -> "Lowercase"
Filter field: "Request URI"
Afterward, the filter order must be set. This is to be carried out as follows:
Exclude Ghost Referral Traffic
Standardize URLs
Set Up Google Tag Manager
Log into Google Tag Manager with your Google Analytics access. If you do not yet have an account for your website there, you can easily do this. Please note that an account is always to be assigned on a company basis, meaning you only need one Google Tag Manager account for your company.
Once this is completed, you must create and configure a container. Typically, a container should be created per domain, and the corresponding domain's URL should be used as the name, e.g., "www.internetwarriors.de". Next, you need to choose the "Web" environment. Once you've done that, the script for the container will be automatically displayed for you. You now need to copy this and integrate it into the source code of ALL pages of the domain. The script must be implemented directly behind the opening <body> tag.
Set Up Google Analytics Universal Tag in Google Tag Manager
To correctly use the Universal Analytics tag, two variables are necessary, which you must create in Google Tag Manager under the "Variables" section:
The first variable is set up as a "Constant." The naming is "Constant - GA UA-Number." The value of the variable is the UA number of the property just set up, e.g., "UA-123456-1." This variable later allows you to easily adjust the UA number of all used tags with just one change of this variable's value.
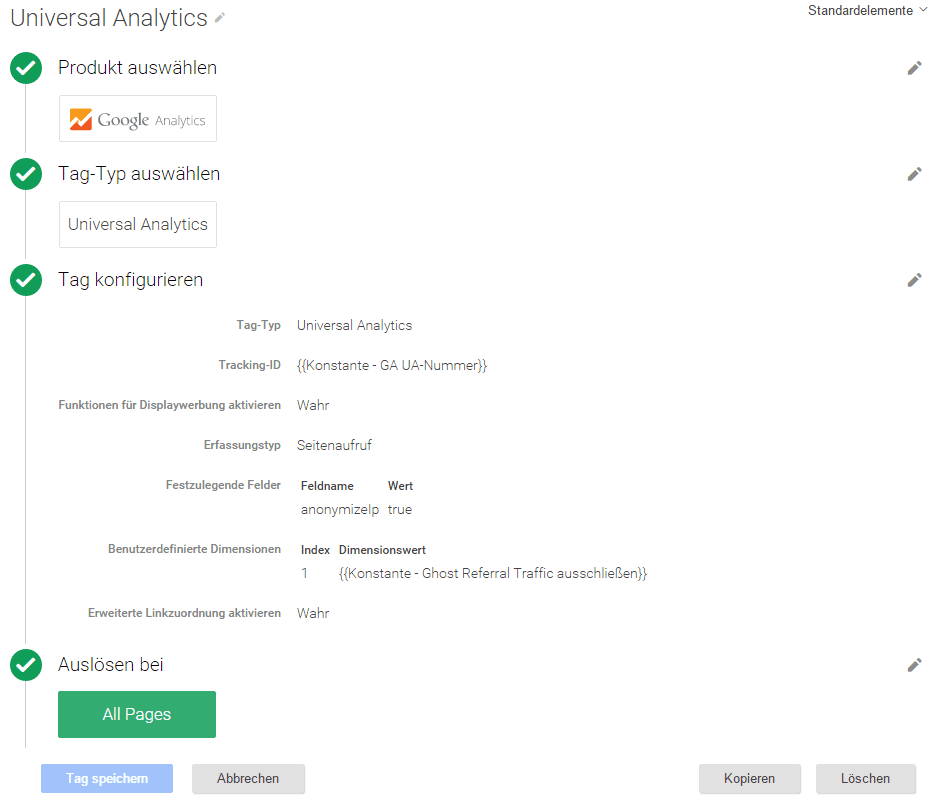
The second variable must also be set as a "Constant." The variable's designation is "Constant - Exclude Ghost Referral Traffic." As a variable value, you can, for example, use "This is a great password." This variable will be used in the further course to exclude spam traffic in Google Analytics. Now create the Google Analytics Universal Tag, which will later provide Google Analytics functionality. It uses the following properties:
Select Product: Google Analytics
Select Tag Type: Universal Analytics
Configure Tag: Tracking ID: Select the variable "Constant - GA UA-Number" via the "+" plus field. It's important that there are only two brackets in front of and behind the words. If it's more or less, it will not work.
Enable Display Advertising Features: Checkbox is checked (This only needs to be done in this tag and is no longer necessary for all other tags.)
Hit Type: Pageview
Fields to Set: Field Name: "anonymizeIp"; Value "true"
Custom Dimensions: Index: "1" (It can also be another number depending on the index number we received when we created the custom dimension in Google Analytics. These two numbers must be identical.); Dimension Value: Select the variable "Constant - Exclude Ghost Referral Traffic" via the "+" plus sign. It's important that there are only two brackets around the words. If there are more or less, it will not work.
Advanced Configuration: Set "Enable Enhanced Link Attribution" to "True"
Fire On: "All Pages"
Save Tag
After creating the tag, you can test the setup in preview mode. For this, you need to click the arrow next to the "Publish" button at the top right and select "Preview." Then surf onto your own website and see a so-called debugger console at the lower browser edge. There it will show you whether the newly created Universal Analytics fires correctly. If this is the case, you should check in the real-time report from Google Analytics whether the accesses are displayed correctly. If everything works, you can publish the tag in Google Tag Manager with a click on the "Publish" button.

Exclude Your Own Accesses and If Possible, Client Access by IP Address
You may want to exclude your own website accesses from Google Analytics tracking. In this case, you need to go back to "Manage" -> "Filter" and set up a new filter there. Always use only the first three octets of your IP address, because using four octets does not work due to IP address anonymization. It's also important that your company has a fixed (static) IP address. If this is not the case, there are alternative options, but we will not go into them here.
You must create the following filter in each data view except "Raw Data." You should adapt the filter name to your company.
Filter name: Exclude itw IP address range
Filter type: "Predefined" -> Exclude" -> "Access from IP addresses" -> "starts with"
IP Address: "111.11.111" (enter the first three octets (number blocks separated by ".") of your IP address here).
Data Protection & Anonymize IP Address
You can find complete information about data protection on Google Analytics on the portal (LINK to: httpss://www.datenschutzbeauftragter-info.de/fachbeitraege/google-analytics-datenschutzkonform-einsetzen/) datenschutzbeauftragter-info.de. Please note that you must use the UA number of your Google Analytics Property when using the script for the opt-out cookie. This is a classic mistake that is often forgotten and results in the opt-out cookie being completely ineffective. Additionally, you must check that the opt-out cookie can be properly set and queried on the privacy page. Afterward, you can also check this in the real-time report of Google Analytics, but only if you have not already excluded your IP address. Otherwise, you will need to temporarily remove this filter.
What We Can Do for You
Are you unsure whether your Google Analytics implementation has been correctly executed or do you feel overwhelmed with the implementation of this guide? Then contact us. We will be happy to discuss the possibilities of web analysis with you, check your implementation and adapt it if necessary. We can also continuously support you in web analysis to derive concrete action instructions for the individual online marketing channels in the long term and thus increase the number of leads.

no comments yet


